注意:在CentOS 8發行版中, yum命令已被 dnf取代,並且在不久的將來,yum軟件包管理器將停止使用。現在建議使用 dnf來安裝軟件包,但是如果您仍然希望使用 yum,則可以使用它。
先決條件
您將需要一台CentOS或RHEL 8(物理或虛擬)計算機,其安裝最少,並具有sudo非root用戶特權。
禁用SELinux
你應該從改變SELINUX=enforcing to SELINUX=disabled in /etc/selinux/config file for smooth installation::
sudo vi /etc/selinux/config

# This file controls the state of SELinux on the system.
# SELINUX= can take one of these three values:
#     enforcing - SELinux security policy is enforced.
#     permissive - SELinux prints warnings instead of enforcing.
#     disabled - No SELinux policy is loaded.
SELINUX=disabled
# SELINUXTYPE= can take one of these three values:
#     targeted - Targeted processes are protected,
#     minimum - Modification of targeted policy. Only selected processes are protected.
#     mls - Multi Level Security protection.
SELINUXTYPE=targeted
Save and close file when you are finished.
Now reboot your machine to take changes into effect:
sudo reboot
Adding EPEL Repository
It is always recommended to install extra packages for enterprise Linux repository before proceeding to install packages using yum package manager:
sudo yum -y install https://dl.fedoraproject.org/pub/epel/epel-release-latest-8.noarch.rpm

sudo ARCH=$( /bin/arch )

sudo dnf config-manager --set-enabled PowerTools
Installing Dependencies
You will need to install following required dependencies prior to install openlitespeed web server:
sudo dnf -y install openssl openssl-libs libargon2 wget tar zip unzip php python36
Installing OpenLiteSpeed
OpenLiteSpeed provides a repository for its software you can use to download and install the server with CentOS’s standard yum command.
sudo rpm --import https://rpms.litespeedtech.com/centos/RPM-GPG-KEY-litespeed sudo dnf -y install https://rpms.litespeedtech.com/centos/litespeed-repo-1.1-1.el8.noarch.rpm sudo dnf -y install openlitespeed lsphp73
Setting the Administrative Password
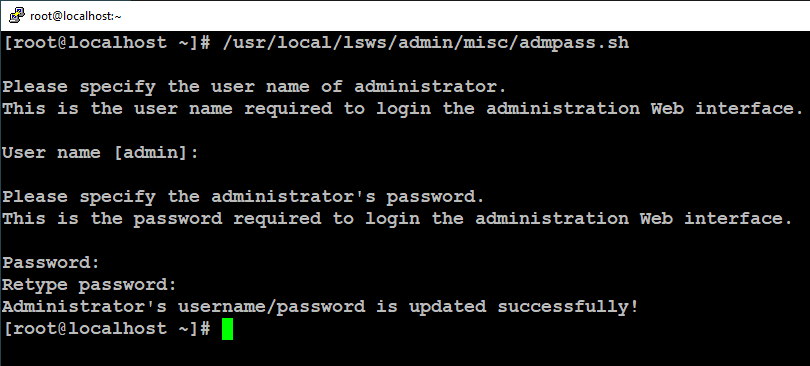
By default, the password is set to 123456, so you should change this immediately. You can do this by running a script provided by OpenLiteSpeed:
sudo /usr/local/lsws/admin/misc/admpass.sh
Verifying Server Status
OpenLiteSpeed should have started automatically after it was installed. You can verify this using the lswsctrl command:
sudo /usr/local/lsws/bin/lswsctrl status Output litespeed is running with PID 9776.
If it is not started, you can start the server using lswsctrl:
sudo /usr/local/lsws/bin/lswsctrl start
Adding Firewall Rules
Now you need to allow these ports from firewall to access OpenLiteSpeed web interface.
sudo firewall-cmd --zone=public --permanent --add-port=8088/tcp sudo firewall-cmd --zone=public --permanent --add-port=7080/tcp sudo firewall-cmd --reload
Installing MySQL
You can install MySQL database using the following command:
sudo dnf -y install mysql-server
Securing MySQL
After fresh installation of MySQL database, you will need to run the following mysql_secure_installation script and follow the instruction to make it secure:
sudo systemctl start mysqld sudo systemctl enable mysqld
sudo mysql_secure_installation
Securing the MySQL server deployment.

Connecting to MySQL using a blank password.

VALIDATE PASSWORD COMPONENT can be used to test passwords and improve security. It checks the strength of password and allows the users to set only those passwords which are secure enough. Would you like to setup VALIDATE PASSWORD component?

Press y|Y for Yes, any other key for No: y

 There are three levels of password validation policy:

 LOW Length >= 8
MEDIUM Length >= 8, numeric, mixed case, and special characters
STRONG Length >= 8, numeric, mixed case, special characters and dictionary file Please enter 0 = LOW, 1 = MEDIUM and 2 = STRONG: 0 Please set the password for root here. New password: Re-enter new password: Estimated strength of the password: 100 Do you wish to continue with the password provided?(Press y|Y for Yes, any other key for No) : y
By default, a MySQL installation has an anonymous user,
allowing anyone to log into MySQL without having to have a user account created for them. This is intended only for testing, and to make the installation go a bit smoother. You should remove them before moving into a production environment.

Remove anonymous users? (Press y|Y for Yes, any other key for No) : y Success.

Normally, root should only be allowed to connect from 'localhost'. This ensures that someone cannot guess at the root password from the network.

Disallow root login remotely? (Press y|Y for Yes, any other key for No) : y Success.

By default, MySQL comes with a database named 'test' that anyone can access. This is also intended only for testing, and should be removed before moving into a production environment.

Remove test database and access to it? (Press y|Y for Yes, any other key for No) : y - Dropping test database...
Success.

- Removing privileges on test database...
 Success.

 Reloading the privilege tables will ensure that all changes made so far will take effect immediately. Reload privilege tables now? (Press y|Y for Yes, any other key for No) : y Success.

All done!
Creating Database for WordPress
WordPress uses MySQL to manage and store site and user information. We already have MySQL installed, but we need to create a database and a user for WordPress to use.
Log in to the root MySQL account like below
sudo mysql -u root -p
Then enter your root user’s password when prompted.
At this point, we will create and name this database and user wordpress to keep things simple and easy to remember, but you can name it whatever you’d like.
From the MySQL prompt, create a database and a user with the following commands:
CREATE DATABASE wordpress DEFAULT CHARACTER SET utf8 COLLATE utf8_unicode_ci; CREATE USER 'wordpress'@'localhost' IDENTIFIED BY 'wordpress'; GRANT ALL PRIVILEGES ON wordpress.* TO 'wordpress'@'localhost'; FLUSH PRIVILEGES; exit
You’re done setting up your MySQL installation to work with WordPress.
Installing Required PHP Extensions
To install these required PHP extensions commonly used with WordPress, execute the following command:
sudo dnf -y install lsphp73-common lsphp73-curl lsphp73-imagick lsphp73-imap lsphp73-json lsphp73-memcached lsphp73-mysqlnd lsphp73-opcache lsphp73-redis
Downloading WordPress
For security reasons, it is recommended that you download the latest version of WordPress directly from their website.
Change into user home directory and then download the latest release by typing:
cd ~/Downloads curl -O https://wordpress.org/latest.tar.gz tar xzvf latest.tar.gz
現在添加一個虛擬的.htaccess文件,以便WordPress可以稍後使用它:
touch ~/Downloads/wordpress/.htaccess
接下來,將示例配置文件複製到WordPress實際讀取的文件名:
cp ~/Downloads/wordpress/wp-config-sample.php ~/Downloads/wordpress/wp-config.php
另外,創建升級目錄,以使WordPress在軟件更新後嘗試自行執行此操作時,不會遇到權限問題:
mkdir ~/Downloads/wordpress/wp-content/upgrade
然後,將目錄的全部內容複製到文檔根目錄中。OpenLiteSpeed帶有一個位於/ usr / local / lsws /目錄中的名為Example的默認虛擬主機。示例虛擬主機的文檔根目錄是html子目錄:
sudo cp -a ~/Downloads/wordpress/. /usr/local/lsws/Example/html/wordpress
請注意,此命令在源目錄的末尾包含一個點,指示應複製目錄中的所有內容,包括隱藏文件(如您創建的.htaccess文件):
您已成功將WordPress安裝到Web服務器上並執行了一些初始配置步驟。
配置WordPress
在開始基於Web的WordPress設置過程之前,您需要調整WordPress目錄中的某些項目。
以下命令將授予OpenLiteSpeed讀寫wordpress目錄中文件的功能,使其可以為網站提供服務並執行自動更新:
sudo chown -R nobody:nobody /usr/local/lsws/Example/html/wordpress sudo find /usr/local/lsws/Example/html/wordpress/ -type d -exec chmod 750 {} \; sudo find /usr/local/lsws/Example/html/wordpress/ -type f -exec chmod 640 {} \;
現在,您需要對主WordPress配置文件進行一些更改。
curl -s https://api.wordpress.org/secret-key/1.1/salt/
您將獲得看起來像這樣的唯一值:

這些配置行可以直接粘貼到配置文件中以設置安全密鑰。將收到的輸出複製到剪貼板,然後打開文檔根目錄中的WordPress配置文件:
sudo vi /usr/local/lsws/Example/html/wordpress/wp-config.php
找到包含那些設置的虛擬值的部分。它看起來像這樣:

刪除這些行並粘貼從命令行複制的值,該文件將如下所示:

接下來,修改文件頂部的數據庫連接設置。您需要調整數據庫名稱,數據庫用戶以及在MySQL中配置的關聯密碼。最後,添加 define(’FS_METHOD’,’direct’); 參數:
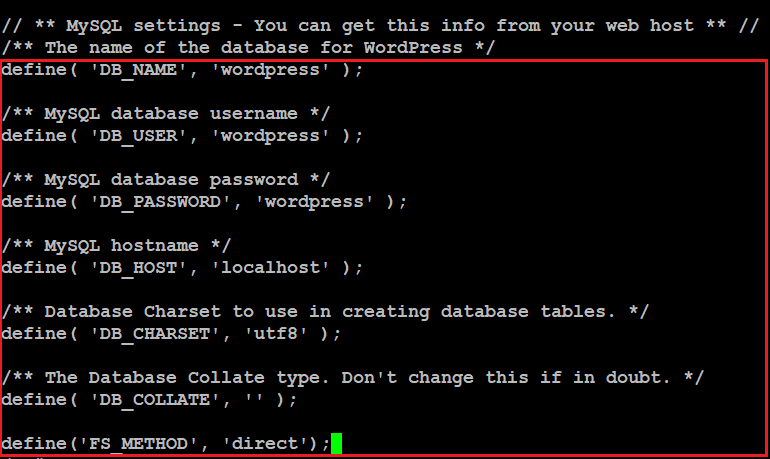
完成後保存並關閉文件。
配置OpenLiteSpeed
在此步驟中,您將訪問OpenLiteSpeed管理界面,並對服務器的配置進行一些更改。
打開您喜歡的Web瀏覽器,導航到OpenLiteSpeed管理界面:
http:// server_name_or_IP:7080 並使用用戶名admin和您使用adminpass.sh腳本設置的密碼登錄。

在OpenLiteSpeed控制台中,找到並單擊左側邊欄菜單中的“ 服務器配置 ”。然後導航到“ 外部應用程序”選項卡,找到LiteSpeed SAPI App的行,然後單擊其“ 編輯”按鈕:
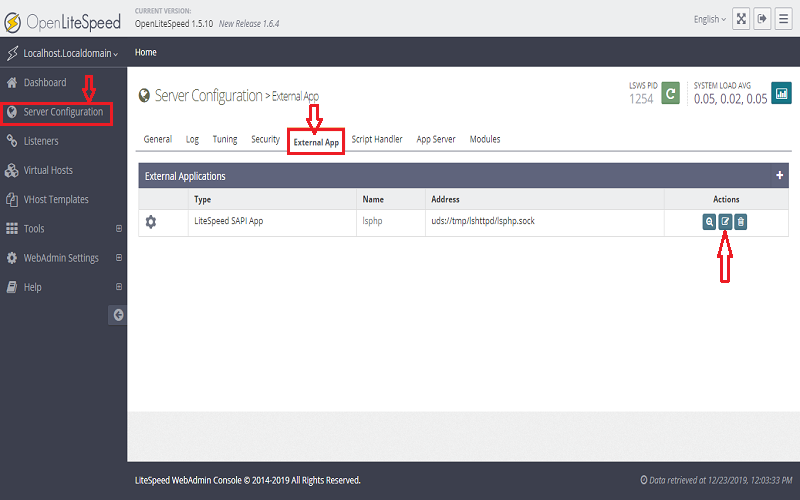
您安裝了lsphp73軟件包,該軟件包是PHP的編譯版本,經過優化可通過LiteSpeed SAPI與OpenLiteSpeed一起使用。但是,“外部應用程序”頁面中的默認設置指向lsphp而不是lsphp73。因此,您的OpenLiteSpeed安裝將無法正確執行PHP腳本。
要更正此問題,請將“名稱”字段更改為lsphp73,將“地址”字段更改為uds://tmp/lshttpd/lsphp73.sock,並將“命令”字段更改為$ SERVER_ROOT / lsphp73 / bin / lsphp:
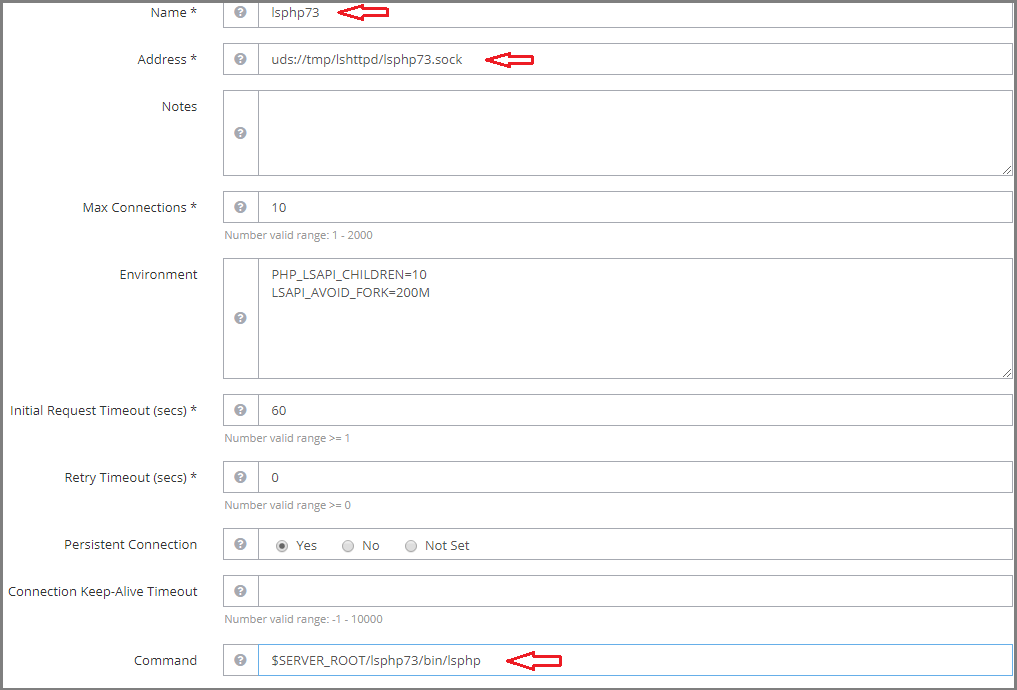
進行這些更改後,單擊LiteSpeed SAPI App框右上角的Save圖標。
接下來,單擊左側菜單中的虛擬主機。在“虛擬主機”頁面上,找到您打算使用的虛擬主機,然後單擊其“ 查看”圖標。對於本指南,我們將使用默認的示例虛擬主機:

導航到虛擬主機的“ 常規”選項卡。在此處找到“ 常規”部分,然後單擊其“ 編輯”按鈕:
您所有的WordPress內容和文件都存儲在您先前創建的wordpress目錄中,更新“ 文檔根目錄”字段以指向該目錄。為此,您需要做的就是將wordpress /附加到默認值的末尾:
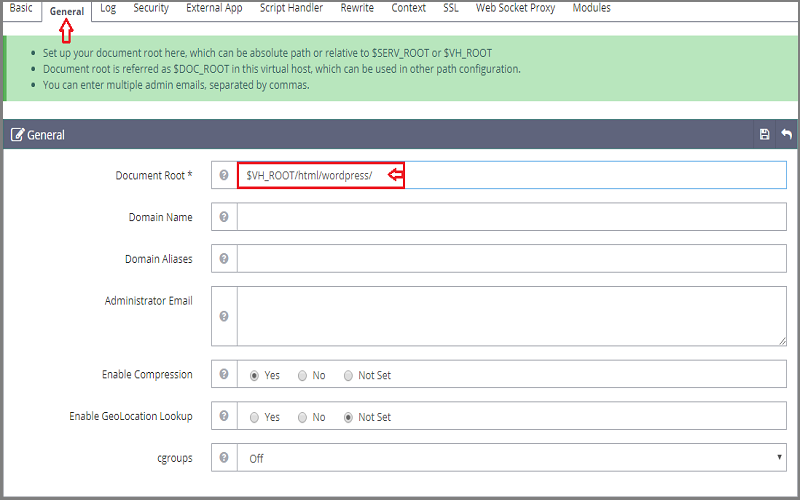
單擊保存圖標以保存此更改。
仍在“ 常規”選項卡中時,向下滾動以找到“ 索引文件”部分,然後單擊其“ 編輯”圖標:
在“ 索引文件”字段中,將index.html放在index.php之前, 並在更新此字段後,如下所示:

單擊“ 保存”圖標,然後繼續。
接下來,導航到虛擬主機的“ 重寫”選項卡。找到“ 重寫控件”部分,然後按“ 編輯”按鈕:
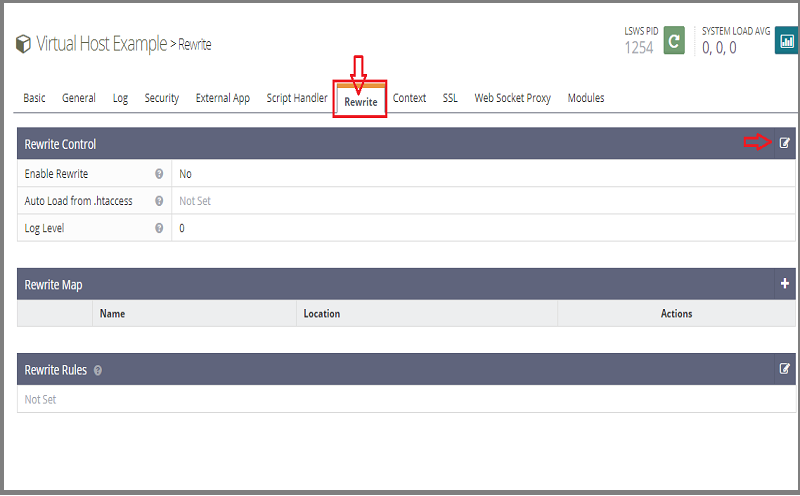
同時設置啟用重寫,並從的.htaccess自動加載選項是通過點擊相應的徑向按鈕。以這種方式配置重寫指令將使您可以在WordPress安裝中使用永久鏈接:

進行更改後,單擊“保存”圖標。
現在,單擊“ 安全性”選項卡,然後在“ 領域列表”表中單擊SampleProtectedArea旁邊的“ 刪除”按鈕:
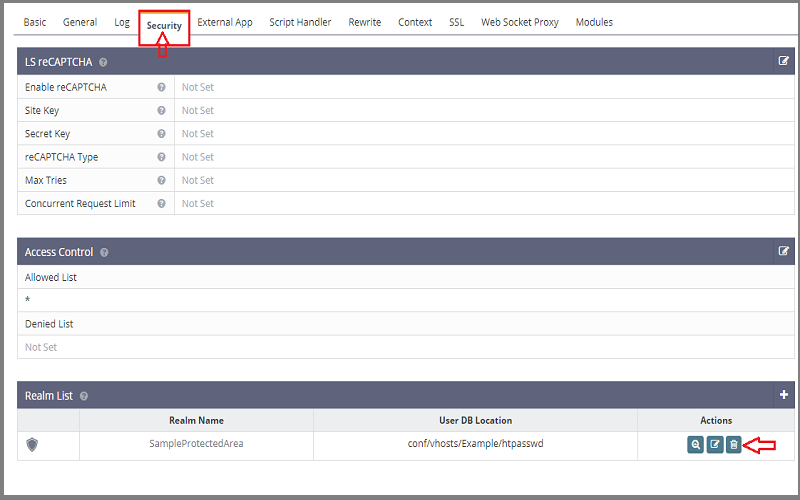

系統將要求您確認刪除。單擊刪除繼續。
接下來,單擊“ 上下文”選項卡。在上下文列表中,刪除與剛刪除的安全領域關聯的/ protected /上下文:
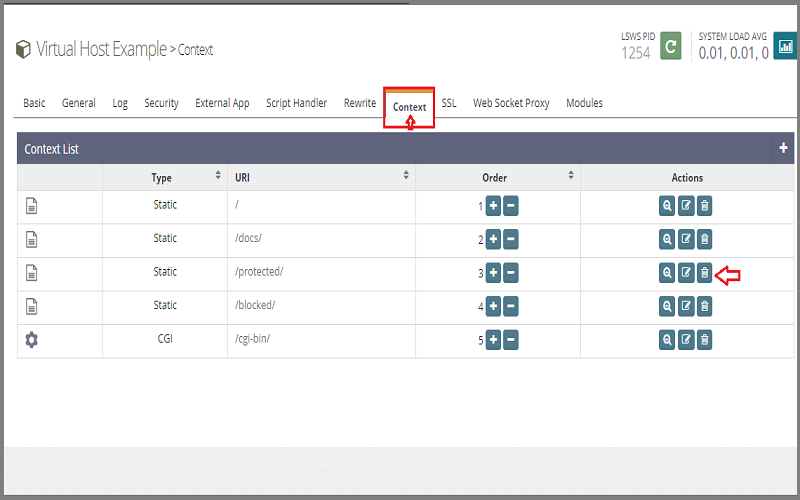
同樣,您將必須通過單擊Delete確認刪除。

現在,按一下OpenLiteSpeed控制台右上角的綠色Graceful Restart圖標。這將重新啟動OpenLiteSpeed服務器,並使我們所做的更改生效:


現在,您準備在瀏覽器中設置WordPress。
完成WordPress安裝
打開您喜歡的Firefox,Chrome Web瀏覽器,導航到服務器的名稱或IP地址:
http:// server_name_or_IP:8088,然後選擇是否要求使用的語言:
接下來,您將看到主設置頁面。為您的WordPress網站選擇一個名稱,然後選擇一個用戶名。系統會自動生成一個強密碼。保存此密碼或選擇其他強密碼。
輸入您的電子郵件地址,然後選擇是否要阻止搜索引擎將您的網站編入索引:

準備就緒後,單擊“ 安裝WordPress”按鈕。您將被帶到一個頁面,提示您登錄:

請輸入登錄用戶名和密碼

登錄後,您將被帶到WordPress管理儀表板:
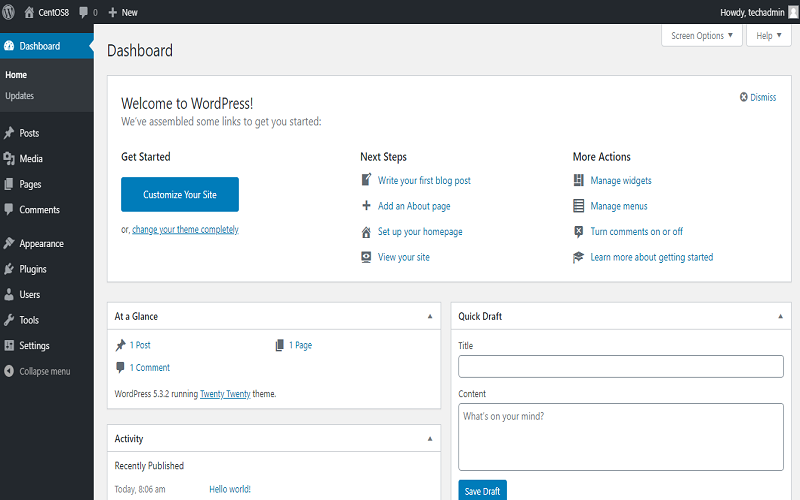
在儀表板上,您可以開始更改網站的主題並發佈內容。
終於完成了
完成本教程後,您在運行OpenLiteSpeed Web服務器的CentOS 8服務器上安裝並配置了WordPress實例。

[…] 後面有另一篇文章將作更深入的說明-如何在CentOS 8上使用OpenLiteSpeed Web服務器設置WordPress […]